Saturday, July 28, 2012

Back to School Interactive Rules & Procedures

I have created a PowerPoint that is EDITABLE through Teachers Pay Teachers to use on the first day of school to really help your students know what is expected of them in your class.  You can change the questions/answers to suit your specific behavior plans.  I have used this "game" with 5th graders for two years, and I will be using it with 4th graders this year.  What a great way to give students a voice from the very beginning of the year!  From my experience, students behave better when they are allowed to take part in the decision-making process and the development of the rules.  They do such a good job every year, and the students really enjoy being an interactive part of this usually "boring" process.  

Just visit this link to download the preview to see if it's something that would work for you!

Friday, July 27, 2012

Hope Hollywood!

Okay, so this is not a teaching-related post, but I am so excited about my sister starting her own blog that I just have to share.  She is such a good writer!  I have told her she needs to start putting her stories down where people can read them.  I know her blog will be interesting!  It has nothing to do with teaching (since she thinks I'm crazy for choosing to be around kids all day as a job), but it is about her life, which I live vicariously through her.  Check it out!!!


I love the name she chose for it, by the way!


Monday, July 23, 2012

Kiss Your Brain!

Last year, following one of our BIG tests at the end of the year, I promised my students that when it was all over with, they could kiss their brains.  Of course, this idea motivated many of them to finish on time and with much effort.  They had no idea what "kiss their brains" meant but offered plenty of suggestions.  After they finished, the students were delighted to find that it meant they received a Hershey's kiss for all their hard work.  As I put it, their brains deserved a treat for doing so well.  This year, I plan to implement this concept from the beginning of the school year and not just for tests.  

I had an old glass candy jar that I have had since I started teaching. (That was a whole 3 years ago!)  


I had also just bought some shimmery stickers for kids to personalize with. 


Why not use what I already had to make an awesome motivational tool?  Couldn't find a reason not to, so this is what I did:


Now, you are not going to believe this, but I bought these alphabet stickers and searched and searched for a "Y" or "y."  I wasn't picky.  There was no "y" whatsoever on any of the 6 sheets I bought!  Crazy I know.  So, I manufactured a "y" with two exclamation points and a lowercase "l."  It is pretty obvious, but kids don't care, right? (as long as they are getting candy...)


... and now all I need are the actual kisses (and some smart brains to kiss!)


* ms. charity *


Friday, July 20, 2012

Calendars, Schedules & Agendas

Since I will be teaching ALL math for 2 different grades this year (this is a first for me and only my second year teaching 5th grade math), I had to re-design my bulletin boards to fit 2 different Calendars for our Calendar Math that goes along with our Singapore "Math in Focus" series.  I really thought calendar last year re-enforced those year-long skills that students needed.  I am not familiar with the 4th grade calendar, but what I have seen so far looks pretty similar to the fifth- just simplified.  Anyway, although the calendars are similar, they focus on different skills at different times throughout the year, so I will need two separate calendars- one for 4th, one for 5th. 

As long as I was re-doing the layout, I thought I might as well change to something that would last a little longer.  So, I exchanged the bulletin board paper for material.  I chose bright orange material to match my curtains that my grandmother made me for my brand new classroom (new building) last year. :)  I kept the same border that matched my orange paper last year.

Here is a picture of my small bulletin board with the curtains:  


... and my new fabric bulletin board with the border from last year. 


I also have a large bulletin board (like two of these out together) in the middle of my room.  I used this bulletin board for the 5th grade calendar last year.  Since I wanted an area to post student achievements and my "Mathematician of the Week" idea that I will share in a later post, I divided the big bulletin board into two areas for calendar.  I used the rest of the orange fabric I bought (I purchased 2 1/2 yards so I had plenty) for one side of the bulletin board.  I wanted the other calendar to be in a different color to contrast the two sides and so I wouldn't have a whole wall of orange plus orange curtains above that.  I chose Kelly Green because I love that color, and it looked good between the orange and with the calendar border.


I chose a border with numbers on it since we will be doing calendar math on this board.  One strip down the middle sets of the two sections wonderfully.


Here is the calendar for 5th grade on the orange side:


Here is a picture of the big bulletin board with the curtains.  The other small bulletin board is on the other side of the right window.  I am glad that I didn't go with ALL orange.


To my small bulletin board, I added a schedule and a student recognition chart.  I plan to put my "Mathematician of the Week" in the empty space above the poster.


On my small whiteboard, I jazzed it up to create an agenda area for my 4 math classes.  I used this last year, and it really helped keep my students, as well as myself, organized.  I laminated the border and placed sticky magnets on the back for easy removal when the board needs a good cleaning.  I love how I had just enough polka dot rectangles left over from the schedule to have one for each class.  I also laminated these and placed magnets on the back.


- ms. charity -


Thursday, July 19, 2012

Monogram Book Ends


When I saw these letters at Hobby Lobby, they were of course not something on my list.  I had an idea to use something I was buying for another project on them, though.  My mom is also a teacher, and her room is decorated in giraffe.  So, I browsed the scrapbook paper and picked up 4 sheets of the giraffe design (one sheet for each side of the "Y's").  I was buying the spray adhesive for another project I will share in a post soon.  All that I needed now was an Exacto knife.  


I sprayed one of the sides of the "Y" with the adhesive, then firmly pressed the "Y" on the back of one of the sheets of giraffe scrapbook paper.  


I made sure to line up the edge of the "Y" with the edge of the paper in order to make a clean line.  
Then, I used my Exacto knife to cut very closely along the edge of the "Y" on all sides.


 This is what it looked like when I finished:


Then, the sides of the "Y" were still not covered, so I decided to paint them a bright color.  What other color to remind us of giraffes than yellow?


I plan to brush on a layer of mod podge over the top just to seal the rough edges.


It stands on its own, and it will look just adorable on a bookcase next to some books!

-CJY-

Wednesday, July 18, 2012

"I'm Done!" Jar & "Hey, that's MY pencil!"

Last year, I wrapped a recycled can in scrapbook paper and covered it with mod podge to be used as a pencil can.  Students would just take my pencils as they pleased, and most never returned them.  It got to the point where I was putting an entire package of pencils in the jar almost daily.  RIDICULOUS.  So, I decided to retire the pencil jar, and add a special touch to make it into something more useful.  I also have a new idea for the pencil problem I will share later in this post.  

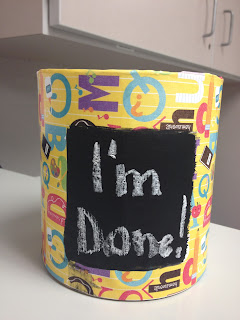
So, I wanted a jar in which students knew where to go to get extra activities if they happen to finish before others, or even just 5 minutes before class is over.  (We all know that 5 minutes for a 5th grader that has nothing to do can mean an eternity for the teacher who is trying to keep the class on task.)  All I did was buy some chalkboard paint, which will serve many uses this year, and paint a small square on this can.  You have to paint horizontally and wait an hour, then add another coat vertically.  After that was finished, I took some chalk and wrote "I'm Done!" on the jar (even though we know that is not proper English!).  I am making an exception for this because there's not enough room to write finished, and we all know students always say, "I'm Done, now what do I do?"  Well, now they will know what to do.  No questions asked.  I wouldn't miss that statement if I never heard it in my classroom again.  So, here it is:


I plan on printing out tasks on strips of paper and folding them up for students to grab.  Hopefully, this will help students who finish early use their time efficiently as well as remind students that rushing through your work doesn't mean there is a prize at the end.  It means you get more math to practice!  hehe...

So, now I had a brand new system in place, but my pencils were homeless.  No problem, I had a wonderful new idea in mind for those pencils.  I created a "Pencil Hospital" in which students are allowed to place their broken, run-down, "sick" pencils for repair or re-sharpening and will not waste class time finding another one.  There, right below the Pencil Hospital, would be a whole drawer full of lively, newly sharpened pencils.  Ahhhh  <---- sigh of relief!

But wait, you say, won't kids now run off with your newly sharpened pencils just like last year, and leave you with their sickly pencils?  Interestingly enough, I have an idea (although it has not been kid-tested or teacher-approved... yet) to fix this pencil problem.  I have secured duct tape (bought for an earlier project) to the ends of all "MY" pencils.  If a student is caught "stealing" one of these, it will be obvious.  This may not fix this never-ending pencil problem, but it will very likely cut down on the number of pencils "stolen" to never be seen again.  So here are my duct-taped pencils.  :)


The Pencil Hospital I spoke of is still under construction, but I will give you a sneak peek of what I am working on.


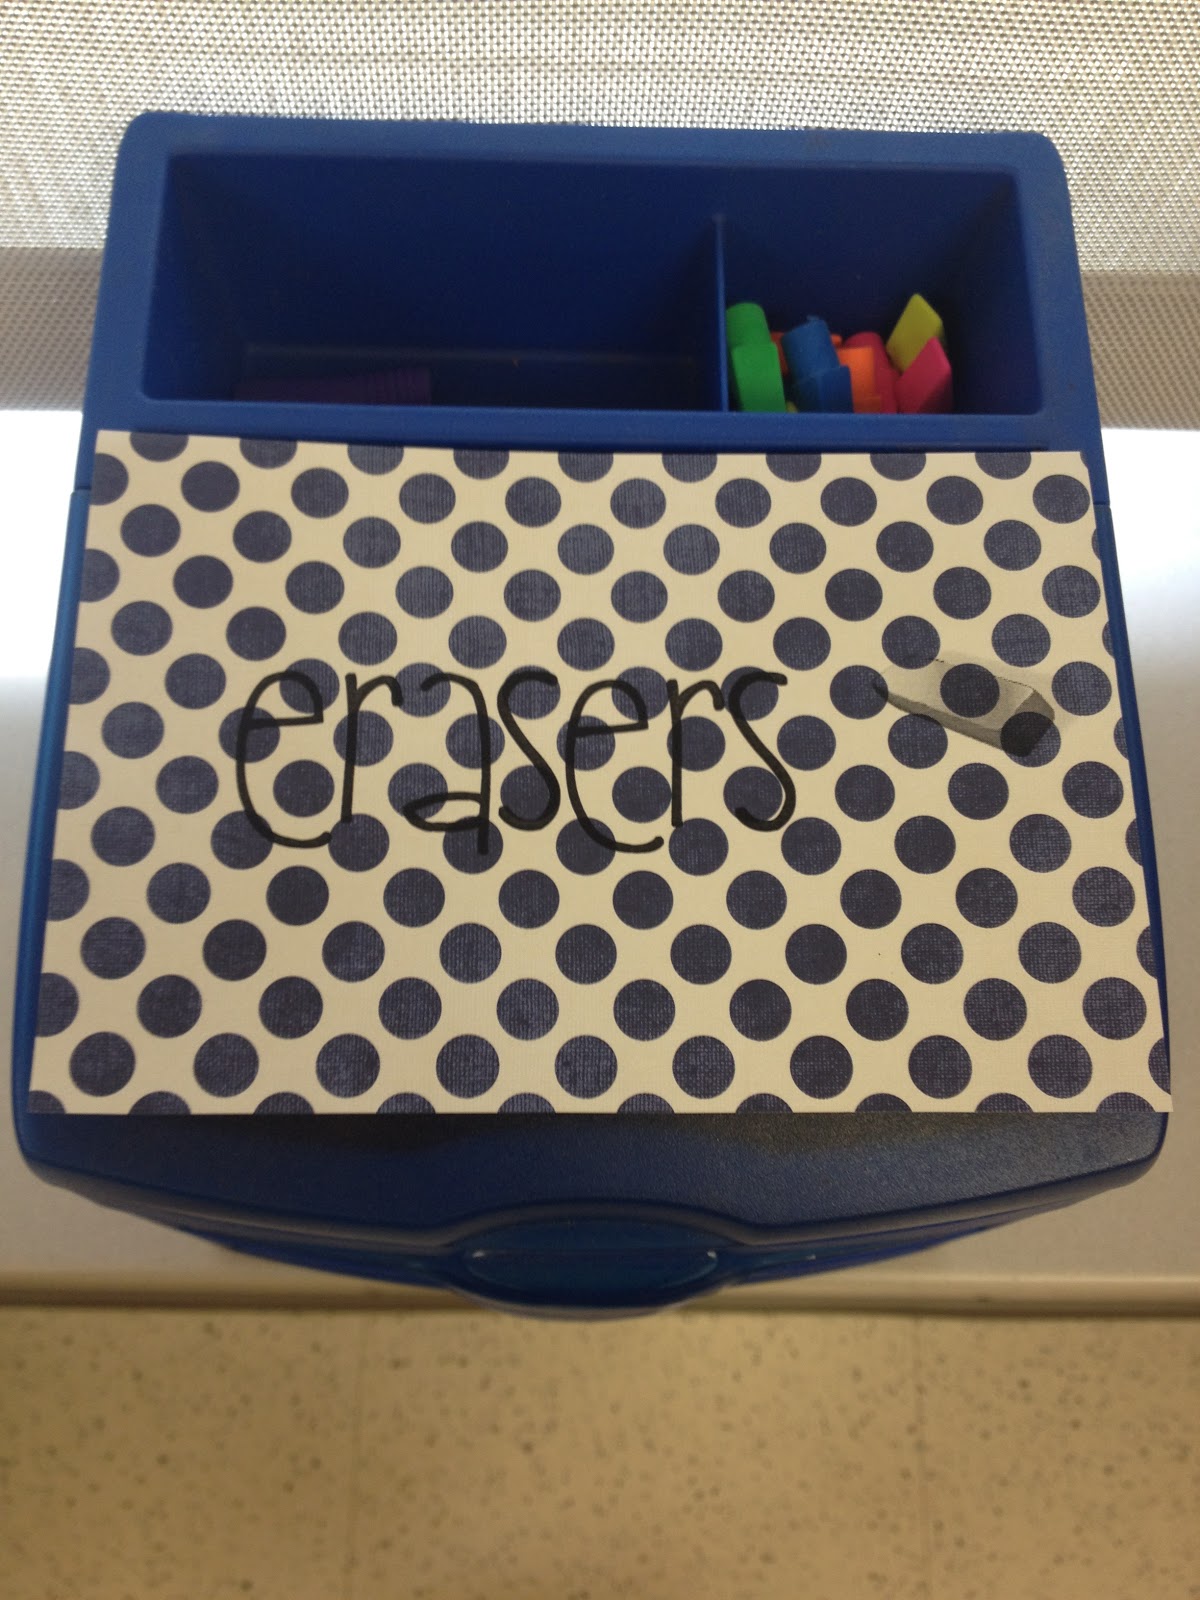
Simple.  Just two drawers- one labeled "Pencil Hospital" and one labeled "Ready Pencils."  The top will have plenty of erasers for when the pencils are fine, but the erasers are worn out.  As you can see in the last picture, the cute scrapbook paper I chose to print on is too busy and dark to be able to read the words clearly, so I will be finding a new design to print on.  I will update with pictures when I find the perfect paper.  

-CJY-


Friday, July 13, 2012

Tulle Decor for Classroom

Yes, I am now in the habit of visiting my classroom EVERY day, and July is not even half over.  Good thing I enjoy it!  I also complete at least one craft, it seems, for my classroom every day.  So, here is the craft (or crafts) of the day: Tulle Balls!


At first, I was just going to make multiplies of 2 colors to decorate, but then I decided to make 6 colors and put one above each group of desks I will have.


I think they turned out pretty cute for how easy and cheap they were, even though my fiance commented that they look like loofahs!

Oh well, they will definitely put some color in my room!  I will update with a picture of how I arranged them in my room soon!

-CJY-  

Thursday, July 12, 2012

Easy Exchange Artwork Display

My weekly (if not bi-weekly) routine throughout the school year: Staple 20-some-odd pieces of artwork on the worn out strip outside my door and remove them one by one less than a week later.  Staple up 20-some-odd new pieces of artwork following the weekly art class.  This routine got very monotonous after about the 47th time doing it.  So, I have created a new system that is not only faster and more efficient but also ADORABLE!  


First, I bought these adorable mini clothespins.  They were a little boring, so I decided to paint them a fun color: turquoise!  


While I was searching for the border for my staple strips for artwork, a brilliant idea came about.  I could glue on these little clothespins to the border to clip work onto instead of stapling, de-stapling, and re-stapling every week!  


So, when I got to school, I got to gluing on the little turquoise clothespins!  Here is what it looks like:


I had to make sure to space out the clips enough so that a normal sized piece of paper could fit both longways and sideways.  


This will make it sooooo easy to take papers down and put them up!  I am so excited about how cute it turned out as well.  I love the black and turquoise together.  


-CJY-


Wednesday, July 11, 2012

Teacher Drop Box

My memories of years past of early morning claustrophobia from children bombarding me with notes, important documents, and other various papers from home that I just HAD to see NOW will not be relived this year.  I have found the solution (and a simple one, at that!) to this annoying little daily ritual that all students I have taught (no matter the age) just insisted on participating in.  The way out can be found in one little word: DROPBOX.  I created my own personal dropbox for student notes in the morning!  This way, I no longer have to play the role of mother duckling with at least 10 little ducklings following me around every morning!  Here is what I did:

1. Found a shoebox that I was no longer using.  In this case, it was from a pair of TOMS I bought in the Spring.  Concise and adorable.  
The cardboard was also easy to paint as opposed to the slickier brands.  

2. I then painted the cardboard box one of my favorite colors: TURQUOISE!


3. I wanted to add an accent color that would stand out as well as match my room.  My curtains and bulletin board are orange, and I liked the idea of orange & turquoise.  An additional plus was the fact that I had sticky orange letters leftover from a gift I made my Florida-Gator-fan fiance.  So, I added my name to the front with the letters:


4. I am excited to announce that I did not purchase ONE THING for this project!  I already had all the items on hand (including the paint!)  So exciting... Anyway, I found a stencil that I used for tiger stripes last year since we are the Tigers.  I thought it would look cute with some tiger stripes on the top.


Oh yeah, I also traced a rectangle on the top, and cut with an exacto knife I had in my pink toolkit to create the "drop" area.

5. I also added stripes to the back and added my initial just because I had some extra space.


I also added stripes to the side of the box as well.

6. Now, I needed to jazz up the front a little bit, so I found some ribbon I'd had for a while that would match just perfectly.  I glued this on around my name with my trusty high-temp mini glue gun!


7.  One last little touch, and I am finished!  Here it is!  Think it will catch the kids' attention, and they will actually use it?!?!  I sure hope so!


-CJY-

Tuesday, July 10, 2012

Welcome Aboard!

Okay, I finally decided on the focal point for my door.  I found this float at Hobby Lobby for 50% off, and then I decided to paint on the words "Welcome Aboard."


I used stencils to paint on the words.  First, I laid out the letters on the float to see how they would fit.


I decided to tape down the letters so they wouldn't go anywhere while I was painting. 


This is how they turned out:


Now, I just need a way to make the letters on the navy blue show through better.  I'm thinking of going over in a gray color.  

So, gray it is.  I went over the stenciled letters (freehand, ahhhhh) in gray so it would show through both the navy blue and white.  Here is how it looks on my door now: 


Definitely easier to read!  Now, all I need is my homeroom roster so I can write the name of each student on my sailboats, and my door will be ready for back-to-school night!!  I will post pictures when it is all finished!  

UPDATE: 
We finally got all the rosters sorted out, so I could put my kids' names on the door!  So exciting!
To go with our sailing theme, I bought a bulletin board set with the sailboats and wheel.  On each sailboat, I wrote my kids' names.  


Under the wheel, I wrote, "Ms. Charity's Sailors- Room 216."


Here is a close-up with my central motif:


It is a little busy, but I think it turned out great! 


-CJY-